WebRTC开发总结
强制WebRTC通过服务器中转数据的方法
在RTCPeerConnection的参数中加上iceTransportPolicy: "relay"
const configuration = { iceServers: [{ urls: 'turn:xxx.com:3478?transport=udp', username: 'xxx', credential: 'xxx' }], iceTransportPolicy: "relay" };

new RTCPeerConnection(configuration);
通过信令交换SRTP密钥的方法
在WebRTC开发中,由于WebRTC强制使用SRTP,因此我们必需在发送SRTP数据包前,交换它的加密密钥。
现行的标准的是通过DTLS来协商密钥,但这样在开法测试的时候增加很多工作量,如果只想简单测试,是可以跳过DTLS这一步,直接走SDP通过信令来交换密钥的。其方法是将DtlsSrtpKeyAgreement设置为false
var DtlsSrtpKeyAgreement = {
   DtlsSrtpKeyAgreement: false,
};
var option = {
   optional: [DtlsSrtpKeyAgreement]
};


const configuration = { iceServers: [{ urls: 'turn:xxx.com:3478?transport=udp', username: 'xxx', credential: 'xxx' }], iceTransportPolicy: "relay" };

new RTCPeerConnection(configuration, option);
此方法貌似已经从标准中废除了,不过可以用来帮助调试,目前使用的Google Chrome 91还支持该功能。
ffmpeg推送RTP数据的方法
ffmpeg -re -i xx.mp4 -vcodec copy -an -f rtp "rtp://127.0.0.1:5004?pkt_size=1200"
这里加pkt_size=1200是为了防止UDP包被分片。
其中-an参数是禁止生成音频流。这是因为ffmpeg限制对同一个RTP端口来说,要么只能推视频流,要么只能推音频流。也就是说,如果你要按如下方法生成RTP流
ffmpeg -re -i xx.mp4 -f rtp "rtp://127.0.0.1:5004"
那么ffmpeg将会报Only one stream supported in the RTP muxer错误。
推视频流的同时,向另一个端口推音频流的方法。
ffmpeg -re -i xx.mp4 -vcodec copy -an -f rtp "rtp://127.0.0.1:5004?pkt_size=1200" -acodec copy -vn -f rtp "rtp://127.0.0.1:5005?pkt_size=1200"
其中-vn参数是禁止生成视频流。
这样就会向5004端口推送视频流,向5005端口推送音频流。
ffmpeg推送SRTP数据的方法
首先需要拿到密钥的base64字符串,可以通过DTLS协商出来,也可以通过如上所述的方法,通过信令交换得到。
假定密钥为MKHKqpAX2bIHAHQlH3mEoshGF+sm4ZgtQW5UPNY5
推送方法为
ffmpeg -re -i xx.mp4 -acodec copy -vn -f rtp -srtp_out_suite AES_CM_128_HMAC_SHA1_80 -srtp_out_params "MKHKqpAX2bIHAHQlH3mEoshGF+sm4ZgtQW5UPNY5" "srtp://127.0.0.1:5004?pkt_size=1200" -vcodec copy -an -f rtp -srtp_out_suite AES_CM_128_HMAC_SHA1_80 -srtp_out_params "MKHKqpAX2bIHAHQlH3mEoshGF+sm4ZgtQW5UPNY5" "srtp://127.0.0.1:5005?pkt_size=1200"
WebRTC SDP与ffmpeg对接时的相关问题
The order of m-lines in answer doesn’t match
Failed to execute 'setRemoteDescription' on 'RTCPeerConnection': Failed to set remote answer sdp: The order of m-lines in answer doesn't match
出现这个错误一般是因为answer里的m=video,m=audio节的顺序与offer中的m=video,m=audio不同。比如,在offer中为
m=audio ......
...
m=video ......
...
而在answer中为
m=video ......
...
m=audio ......
...
所以只需要调整一下顺序就可以了
关于浏览器和ffmpeg对SDP中rtmap的理解不一致的问题
举例来说
如chrome浏览器生成的一个offer的SDP,其m=audio和m=video后跟的是代表该浏览器方支持的编码格式。发给该浏览器的音频视频只能从列出的编码器中选择,且生成的RTP包的payload_type值也应取列表中对应的值。比如,要给浏览器发送opus的音频编码,则其发送的RTP包的payload_type值应该为111。
m=audio 9 RTP/SAVPF 111 103 104 9 0 8 106 105 13 110 112 113 126
...
a=rtpmap:111 opus/48000/2
a=rtcp-fb:111 transport-cc
a=fmtp:111 minptime=10;useinbandfec=1
a=rtpmap:103 ISAC/16000
a=rtpmap:104 ISAC/32000
a=rtpmap:9 G722/8000
a=rtpmap:0 PCMU/8000
a=rtpmap:8 PCMA/8000
a=rtpmap:106 CN/32000
a=rtpmap:105 CN/16000
a=rtpmap:13 CN/8000
a=rtpmap:110 telephone-event/48000
a=rtpmap:112 telephone-event/32000
a=rtpmap:113 telephone-event/16000
a=rtpmap:126 telephone-event/8000
...
m=video 9 RTP/SAVPF 96 97 98 99 100 101 102 121 127 120 125 107 108 109 35 36 124 119 123 118 114 115 116
...
a=rtpmap:96 VP8/90000
a=rtcp-fb:96 goog-remb
a=rtcp-fb:96 transport-cc
a=rtcp-fb:96 ccm fir
a=rtcp-fb:96 nack
a=rtcp-fb:96 nack pli
a=rtpmap:97 rtx/90000
a=fmtp:97 apt=96
a=rtpmap:98 VP9/90000
a=rtcp-fb:98 goog-remb
a=rtcp-fb:98 transport-cc
a=rtcp-fb:98 ccm fir
a=rtcp-fb:98 nack
a=rtcp-fb:98 nack pli
a=fmtp:98 profile-id=0
a=rtpmap:99 rtx/90000
a=fmtp:99 apt=98a=rtpmap:100 VP9/90000
a=rtcp-fb:100 goog-remb
a=rtcp-fb:100 transport-cc
a=rtcp-fb:100 ccm fir
a=rtcp-fb:100 nack
a=rtcp-fb:100 nack pli
a=fmtp:100 profile-id=2
...
而对于ffmpeg生成的SDP,其m=audio和m=video后跟的代表是ffmpeg生成的数据的编码方式。
v=0
o=- 0 0 IN IP4 127.0.0.1
s=No Name
t=0 0
a=tool:libavformat 58.76.100
m=video 5004 RTP/AVP 96
c=IN IP4 127.0.0.1
a=rtpmap:96 VP8/90000
m=audio 5005 RTP/AVP 97
c=IN IP4 127.0.0.1
a=rtpmap:97 opus/48000/2
一个是允许收到的编码,一个是生成的编码,这里有一个严重的差异。因此在调试WebRTC时,不要想当然的认为浏览器创建的SDP里的rtpmap指的是它生成的数据的编码格式。
另外,ffmpeg的编码一般从96开始递增。
我们看到对于96的VP8的视频编码,其刚好与chrome生成的SDP中的一致,编号96和编码格式VP8刚好能与chrome生成的对上。然而对于音频就没那么幸运了。以opus编码格式为例,ffmpeg生成的编号为97,而浏览器chrome生成的SDP的opus的编号为111,因此浏览器无法直接接受ffmpeg推过来的音频流。而ffmpeg不支持在命令行中指定这些编号,因此我们只能修改ffmpeg代码。
只需将libavformat/rtp.c中的ff_rtp_get_payload_type函数的最后的return语句改成return RTP_PT_PRIVATE + (idx*(111-RTP_PT_PRIVATE));就可以生成编号为111的opus编码格式的SDP了。(我更改ffmpeg代码的版本是ffmpeg-4.4)
如下:
v=0
o=- 0 0 IN IP4 127.0.0.1
s=No Name
t=0 0
a=tool:libavformat 58.76.100
m=video 5004 RTP/AVP 96
c=IN IP4 127.0.0.1
a=rtpmap:96 VP8/90000
m=audio 5005 RTP/AVP 111
c=IN IP4 127.0.0.1
a=rtpmap:111 opus/48000/2
到此,想要将ffmpeg推送的SRTP流传递给浏览器的WebRTC,还有一件事没搞定。就是上文提到的ffmpeg只能将音视频数据分别推送到两个不同的端口。而WebRTC的音视频数据在一个端口上接收。做到这一点的方法很简单,就是分别写音视频的参数,并把们他传到同一个端口即可。
同样,假定密钥为MKHKqpAX2bIHAHQlH3mEoshGF+sm4ZgtQW5UPNY5
ffmpeg -re -i xx.mp4 -acodec copy -vn -f rtp -srtp_out_suite AES_CM_128_HMAC_SHA1_80 -srtp_out_params "MKHKqpAX2bIHAHQlH3mEoshGF+sm4ZgtQW5UPNY5" "srtp://127.0.0.1:5004?pkt_size=1200" -vcodec copy -an -f rtp -srtp_out_suite AES_CM_128_HMAC_SHA1_80 -srtp_out_params "MKHKqpAX2bIHAHQlH3mEoshGF+sm4ZgtQW5UPNY5" "srtp://127.0.0.1:5004?pkt_size=1200"
生成的SDP如下
v=0
o=- 0 0 IN IP4 127.0.0.1
s=No Name
t=0 0
a=tool:libavformat 58.76.100
m=audio 5004 RTP/AVP 111
c=IN IP4 127.0.0.1
b=AS:65
a=rtpmap:111 MPEG4-GENERIC/48000/2
a=fmtp:111 profile-level-id=1;mode=AAC-hbr;sizelength=13;indexlength=3;indexdeltalength=3; config=1190
a=crypto:1 AES_CM_128_HMAC_SHA1_80 inline:MKHKqpAX2bIHAHQlH3mEoshGF+sm4ZgtQW5UPNY5
m=video 5004 RTP/AVP 96
c=IN IP4 127.0.0.1
b=AS:348
a=rtpmap:96 H264/90000
a=fmtp:96 packetization-mode=1; sprop-parameter-sets=Z2QAHqzKcCgL/lmoEAgKAAADAAIAAAMAZB4sWU8=,aOvvLA==; profile-level-id=64001E
a=crypto:1 AES_CM_128_HMAC_SHA1_80 inline:MKHKqpAX2bIHAHQlH3mEoshGF+sm4ZgtQW5UPNY5
如果要把这个SDP传递给浏览器,还可以进一步精简一下:
v=0
o=- 0 0 IN IP4 127.0.0.1
s=-
t=0 0
m=audio 5004 RTP/AVP 111
c=IN IP4 127.0.0.1
a=rtpmap:111 MPEG4-GENERIC/48000/2
a=crypto:1 AES_CM_128_HMAC_SHA1_80 inline:MKHKqpAX2bIHAHQlH3mEoshGF+sm4ZgtQW5UPNY5
m=video 5004 RTP/AVP 96
c=IN IP4 127.0.0.1
a=rtpmap:96 H264/90000
a=crypto:1 AES_CM_128_HMAC_SHA1_80 inline:MKHKqpAX2bIHAHQlH3mEoshGF+sm4ZgtQW5UPNY5
CentOS 8编译ffmepg的方法
yum install frei0r-plugins.x86_64
yum install autoconf automake bzip2 cmake freetype-devel gcc gcc-c++ git libtool make mercurial pkgconfig zlib-devel harfbuzz-devel
yum install gmp-devel.x86_64 gmp-c++.x86_64
yum install pkgconf-pkg-config.x86_64 python3-colcon-pkg-config.noarch python3-pkgconfig.noarch perl-ExtUtils-PkgConfig.noarch
yum install gnutls gnutls-utils.x86_64 gnutls-devel.x86_64
yum install libass-devel.x86_64 libass.x86_64
yum install libdav1d-devel.x86_64
yum install opus-devel.x86_64
yum install libvmaf-devel.x86_64
yum install libvpx.x86_64
yum install baresip-vp8.x86_64
yum install libvorbis
wget -c https://www.nasm.us/pub/nasm/releasebuilds/2.15.05/nasm-2.15.05.tar.gz
tar xvf nasm-2.15.05.tar.gz
cd nasm-2.15.05
./configure
make
make install
wget -c https://github.com/webmproject/libvpx/archive/v1.10.0/libvpx-1.10.0.tar.gz
tar xvf libvpx-1.10.0.tar.gz
cd libvpx-1.10.0
./configure
make
make install
wget -c https://ffmpeg.org/releases/ffmpeg-4.4.tar.gz
cd ffmpeg-4.4
./configure --disable-x86asm --enable-libvpx --enable-decoder=vp8 --enable-libopus
make
如果想支持H264的话:
先安装libx264
git clone https://code.videolan.org/videolan/x264.git
cd x264
./configure --enable-static --enable-shared
make
make install
再重新编译ffmpeg
./configure --disable-x86asm --enable-libvpx --enable-decoder=vp8 --enable-libopus --enable-libx264 --enable-gpl
SDP ICE相关
指定ICE用户名和密码
a=ice-ufrag:MRa1
a=ice-pwd:c7Q1lz1Q9dSszKmTBaT0IhST
a=ice-options:trickle
其中a=ice-ufrag后跟的用户名片段(为什么是片段后面会讲到),a=ice-pwd后跟的是密码,它俩一起用于ICE的短凭据认证机制。
而a=ice-options:trickle 是通知对方,SDP没有包含Candidate信息,该信息会分开传输。
这里需要补充说明一下:
ICE的用户名构造方法:
双方SDP中都有
a=ice-ufrag:xxxx,假设用户A、B进行ICE协议交互,A的ufrag为USRa,B的ufrag为usrB,若A发消息给B,则用户名为usrB:USERa,反之若B发消息给A,则用户名为USRa:usrB。ICE的密码用法:
在构造
BindingRequest发给对方来检查连通性时,使用的密码是对方通过SDP传来的密码。 在构造对对方BindingRequest的BindingResponse时,使用的密码是己方传递给对方的SDP中的密码。同样假定,如果A的密码为
pwdA,B的密码为pwdB则:如果A要构造一个
BindingRequest发给B,使用的密码是pwdB。如果A要构造一个
BindingResponse来响应B发过来的BindingRequest,使用的密码是pwdA。
连接性检查
不仅要在ChannelBind之前响应对方的BindingRequest,在ChannelBind之后也需要响应对方的BindingRequest,不然就会disconnected然后failed。
addIceCandidate失败
Uncaught (in promise) DOMException: Failed to execute 'addIceCandidate' on 'RTCPeerConnection': Error processing ICE candidate
这个一般是因为candidate比SDP先到,导致在调用setRemoteDescription之前,先调用了addIceCandidate。只要保证在调用setRemoteDescription后再调用addIceCandidate就不会有这个问题。有时候纵然信令服务器能保证这个顺序,但有可能sdp和candidate前后相差极短的时候到达浏览器,所以在浏览器的js层执行的时候就不能保证顺序,因此需要在js层代码做好逻辑。
例如在收到candidate的地方执行如下操作:
// 假定localPC为本地的RTCPeerConnection对象
function onGotRemoteCandidate(candidate) {
   function addIceCandidate() {
      if(!localPC.currentRemoteDescription) {
         setTimeout(addIceCandidate, 20)
      } else {
         localPC.addIceCandidate(candidate);
      }
   }
   addIceCandidate();
}
SDP DTLS相关
a=fingerprint
a=fingerprint:sha-256 FD:68:9E:14:07:6F:67:1E:DB:9B:E4:BE:C3:AB:44:77:8D:01:77:A8:E3:9E:35:62:21:CF:80:51:3C:5A:13:DE
WebRTC需要利用DTLS来交换SRTP使用的密钥,在创建DTLS连接的时候,会通过ClientHello或ServerHello中的Certificate获取到对方的证书,在获取到证书之后会通过a=fingerprint:指定的加密算法(此处为sha-256)来算出该证书的签名值,并与a=fingerprint:sha-256之后的值进行比对,如果不匹配,则证书被篡改,连接失败。
比如收到一个fingerprint为如下的SDP:
a=fingerprint:sha-256 FE:6D:C8:D1:4B:BF:95:9D:33:D5:45:C4:34:8F:95:04:68:9A:95:5D:16:2E:64:58:4D:4F:FE:49:AD:CA:D2:0A
同时它发来的Certificate如下:
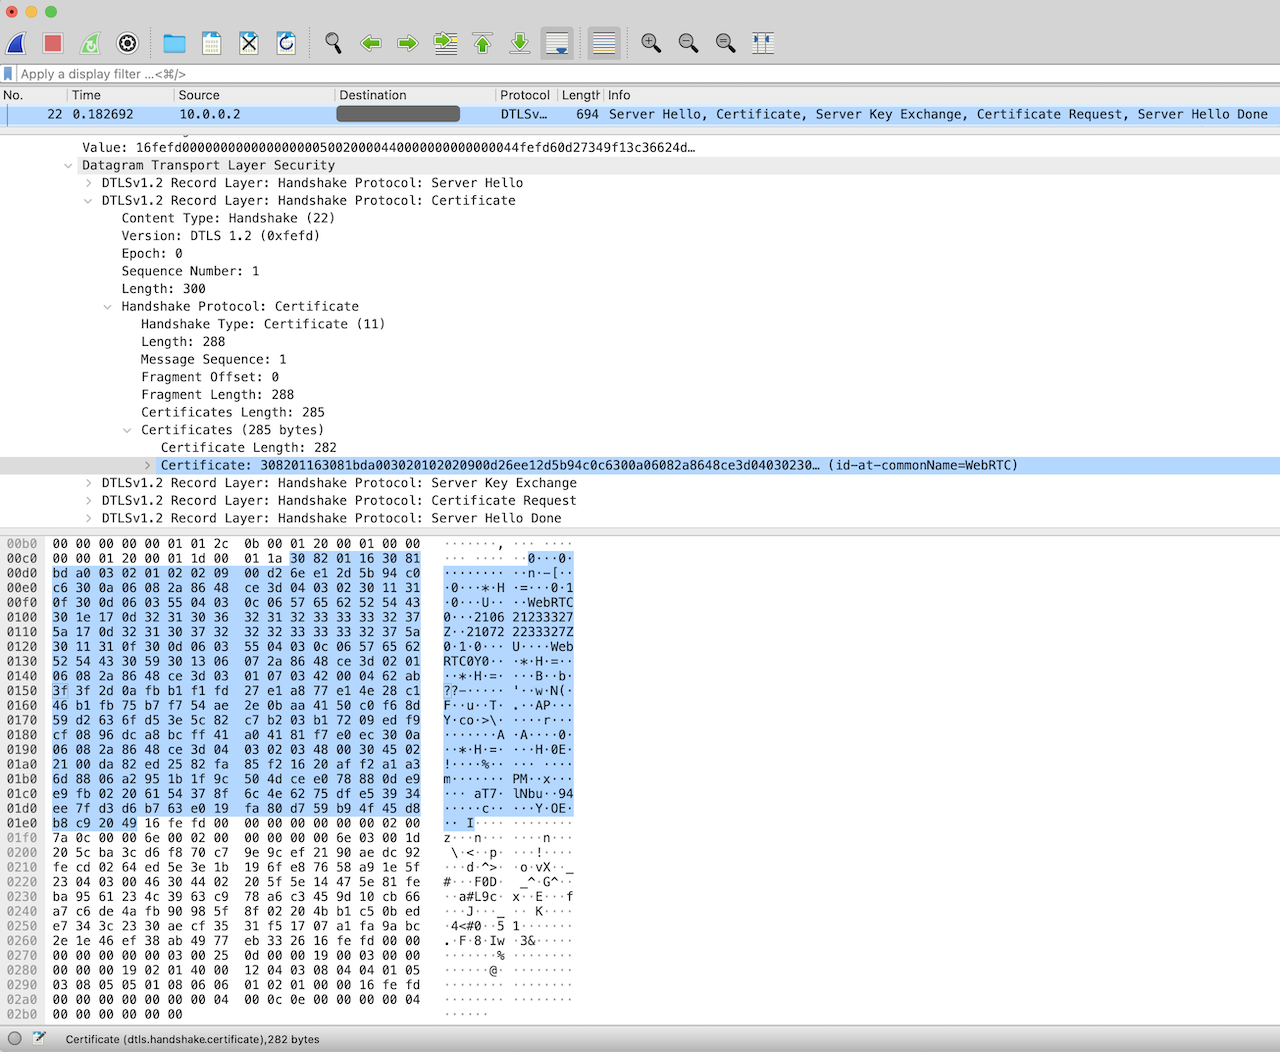
则可以计算出它的sha-256值为FE:6D:C8:D1:4B:BF:95:9D:33:D5:45:C4:34:8F:95:04:68:9A:95:5D:16:2E:64:58:4D:4F:FE:49:AD:CA:D2:0A正好与SDP中的匹配。
示例验证程序如下:
package main

import (
	"crypto/sha256"
	"fmt"
	"strings"
)

// 方法是对DTLS发来的Handshake里的Certificate求SHA256
// 以下数据可以通过Wireshark的Copy --> ...as Hex Dump来直接获取
var dataStr string = `
0000   30 82 01 16 30 81 bd a0 03 02 01 02 02 09 00 d2
0010   6e e1 2d 5b 94 c0 c6 30 0a 06 08 2a 86 48 ce 3d
0020   04 03 02 30 11 31 0f 30 0d 06 03 55 04 03 0c 06
0030   57 65 62 52 54 43 30 1e 17 0d 32 31 30 36 32 31
0040   32 33 33 33 32 37 5a 17 0d 32 31 30 37 32 32 32
0050   33 33 33 32 37 5a 30 11 31 0f 30 0d 06 03 55 04
0060   03 0c 06 57 65 62 52 54 43 30 59 30 13 06 07 2a
0070   86 48 ce 3d 02 01 06 08 2a 86 48 ce 3d 03 01 07
0080   03 42 00 04 62 ab 3f 3f 2d 0a fb b1 f1 fd 27 e1
0090   a8 77 e1 4e 28 c1 46 b1 fb 75 b7 f7 54 ae 2e 0b
00a0   aa 41 50 c0 f6 8d 59 d2 63 6f d5 3e 5c 82 c7 b2
00b0   03 b1 72 09 ed f9 cf 08 96 dc a8 bc ff 41 a0 41
00c0   81 f7 e0 ec 30 0a 06 08 2a 86 48 ce 3d 04 03 02
00d0   03 48 00 30 45 02 21 00 da 82 ed 25 82 fa 85 f2
00e0   16 20 af f2 a1 a3 6d 88 06 a2 95 1b 1f 9c 50 4d
00f0   ce e0 78 88 0d e9 e9 fb 02 20 61 54 37 8f 6c 4e
0100   62 75 df e5 39 34 ee 7f d3 d6 b7 63 e0 19 fa 80
0110   d7 59 b9 4f 45 d8 b8 c9 20 49
`

func getData() []byte {
	lines := strings.Split(dataStr, "\n")
	var data []byte
	for _, line := range lines {
		if len(line) <= 7 {
			continue
		}

		line = line[7:]
		digits := strings.Split(line, " ")
		for _, digit := range digits {
			n := byte(0)
			fmt.Sscanf(digit, "%02x", &n)
			data = append(data, n)
		}
	}

	return data
}

func main() {
	data := getData()
	sum := sha256.Sum256(data)
	var sumhexs []string
	for _, n := range sum {
		sumhexs = append(sumhexs, fmt.Sprintf("%02X", n))
	}
	fmt.Printf("%v\n", strings.Join(sumhexs, ":"))
}
稍专业一点的方法为
func parseCert(data []byte) {
	cert, err := x509.ParseCertificate(data)
	if err != nil {
		log.Printf("parse certificate failed: %v", err)
	}

	algo := crypto.SHA256
	h := algo.New()
	h.Write(cert.Raw[:])

	digest := h.Sum(nil)
	fingerprint := buildFingerprintString(digest)

	fmt.Printf("%v\n", fingerprint)
}

func buildFingerprintString(digest []byte) string {
	var ds []string
	for _, d := range digest {
		ds = append(ds, fmt.Sprintf("%02X", d))
	}
	return strings.Join(ds, ":")
}

func main() {
	data := getData()
	parseCert(data)
}
a=setup
a=setup:active
a=setup表示DTLS协商过程中谁是客户端,谁是服务器。作为客户端的一方先发起ClientHello (RFC4145 第4节)
a=setup:actpass即可以是客户端,也可以是服务器a=setup:active客户端a=setup:passive服务器端a=setup:holdconn不能建立连接
a=crypto
a=crypto:0 AES_CM_128_HMAC_SHA1_80 inline:c8N3hDG05gd+tPF6tg/kGsKSk+YaIMfTlOaz0+Jg
a=crypto:1 AEAD_AES_256_GCM inline:8zzSfx3+/kxanoyyVhv+fs4zN+om8/Iop+1RSbKl+lD8sJLT81nxFVfjevw=
a=crypto:2 AEAD_AES_128_GCM inline:IiX+GLVxAgMEqLKY/7uM5m0r6ou5G0OGSn+o5Q==
DTLS通过信令交换的用于SRTP加密的密钥,和加密套件。
其中inline后跟的字符串是base64编码,解码之后其实是Key+Salt。Key的长度由前面的加密套件来指定的。对于AES_CM_128_HMAC_SHA1_80来说,base64解码后是30字节,其中Key占16字节即128bit。
更详细可以参考 RFC4568 第6节
   +---------------------+-------------+--------------+---------------+
   |                     |AES_CM_128_  | AES_CM_128_  | F8_128_       |
   |                     |HMAC_SHA1_80 | HMAC_SHA1_32 |  HMAC_SHA1_80 |
   +---------------------+-------------+--------------+---------------+
   | Master key length   |   128 bits  |   128 bits   |   128 bits    |
   | Master salt length  |   112 bits  |   112 bits   |   112 bits    |
   | SRTP lifetime       | 2^48 packets| 2^48 packets | 2^48 packets  |
   | SRTCP lifetime      | 2^31 packets| 2^31 packets | 2^31 packets  |
   | Cipher              | AES Counter | AES Counter  | AES F8 Mode   |
   |                     | Mode        | Mode         |               |
   | Encryption key      |   128 bits  |   128 bits   |   128 bits    |
   | MAC                 |  HMAC-SHA1  |  HMAC-SHA1   |  HMAC-SHA1    |
   | SRTP auth. tag      |    80 bits  |    32 bits   |    80 bits    |
   | SRTCP auth. tag     |    80 bits  |    80 bits   |    80 bits    |
   | SRTP auth. key len. |   160 bits  |   160 bits   |   160 bits    |
   | SRTCP auth. key len.|   160 bits  |   160 bits   |   160 bits    |
   +---------------------+-------------+--------------+---------------+